
https://schteppe.github.io/cannon.js/
schteppe/cannon.js @ GitHub
schteppe.github.io
Three.js에서는 여러가지 물리엔진 라이브러리를 지원합니다.
그 중에서도 cannon.js는 다루기 쉬운 편에 속하는 라이브러리입니다.
다음과 같이 설치할 수 있습니다.
npm install cannon-esCannon.js는 물리엔진의 주체가 되는 body를 만들어 서로 상호작용 시킵니다.
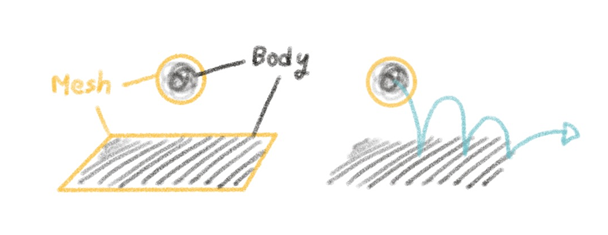
Three.js의 mesh가 눈에 보이는 형태라면, cannon.js의 body가 실제 알맹이라고 볼 수 있습니다.
때문에 매 프레임마다 mesh의 transform을 cannon body와 동기화한다면 실제 물리적 상호작용을 화면에 랜더링 할 수 있습니다.
1. 세계 만들기
먼저 물리법칙이 작용할 세계를 만들어야 합니다.
Wolrd 객체로 설정하며 이 세계는 중력, 마찰력 등의 세기를 임의로 설정할 수 있습니다.
import * as CAN from 'cannon-es';

const canWorld = new CAN.World();
canWorld.gravity.set(0, -10, 0); // 중력 설정
2. 재질 만들기
Cannon.js에도 material이 존재하며, Material 객체를 통해 설정합니다.
이 material은 물리법칙이 작용할 물체의 표면을 정의합니다.
때문에 같은 material을 공유하는 cannon body라면 같은 물리량을 공유하게 됩니다.
선언 시 이름을 인자로 받을 수 있으며, 후에 [material].name으로 접근 가능합니다.
const defaultCanMaterial = new CAN.Material('default');
const playerCanMaterial = new CAN.Material('player');
3. 상호작용 처리
Material끼리 접촉했을 때 마찰, 탄성 등의 충돌 처리를 설정할 수 있습니다. ContactMaterial 객체를 통해 설정합니다.
아래 예시는 기본적인 충돌 경우에 대한 처리로, 이 경우엔 World.defaultContactMaterial 값에 저장할 수 있습니다.
const defultContactMaterial = new CAN.ContactMaterial(
    defaultCanMaterial, // 접촉하는 재질1
    defaultCanMaterial, // 접촉하는 재질2
    {
        friction: 1, // 마찰계수
        restitution: 0.2 // 반발계수
    }
);
// default 값
canWorld.defaultContactMaterial = defultContactMaterial;
만약 기본값이 아닌 특수한 경우(e.g. 플레이어와 다른 물체 사이의 접촉)를 설정하고자 한다면, World.addContactMaterial( ) 함수를 통해 설정할 수 있습니다.
const playerContactMaterial = new CAN.ContactMaterial(
    playerCanMaterial,
    defaultCanMaterial,
    {
        friction: 100,
        restitution: 0,
    }
)
canWorld.addContactMaterial(playerContactMaterial);
4. 물체에 body 적용
물리적 상호작용을 위한 환경을 모두 설정 했으니, 이제 실제로 물체에 물리엔진을 적용하면 됩니다.
cannon.js는 물체의 충돌 면적(부피)를 계산하기 위한 Body( ) 객체를 제공합니다.
이 Body( )객체를 1절에서 만들었던 World 객체에 추가하면 상호작용이 가능해집니다.
import * as CAN from 'cannon-es';

const position = // {x: ..., y: ..., z: ...};
const shape = // {width: ..., height: ..., depth: ...};

const cannonBody = new CAN.Body({
    mass: this.mass,  // 질량
    position: new CAN.Vec3(position.x, position.y, position.z),  // 위치
    shape: new CAN.Box(new CAN.Vec3(shape.width/2, shape.height/2, shape.depth/2)),  // 크기
    this.cannonBody.material = cannon.defaultMaterial, // material
})

// 1.에서 만든 cannon world
world.addBody(cannonBody);
이 외에 constructor에서 설정할 수 있는 값들은 아래 문서를 참고하면 됩니다.
https://schteppe.github.io/cannon.js/docs/classes/Body.html
Body - cannon
Body () Parameters: [options] Object optional [position] Vec3 optional [velocity] Vec3 optional [angularVelocity] Vec3 optional [quaternion] Quaternion optional [mass] Number optional [material] Material optional [type] Number optional [linearDamping=0.01]
schteppe.github.io
이제 물체의 cannon body는 다른 body들과 물리적으로 상호작용하게 됩니다.
하지만 아직은 물리적 상호작용을 화면에서 볼 수 없습니다.
이 때 바뀌는 값들은 cannon body의 값일 뿐, 우리 눈에 보이는 mesh의 값은 변하지 않기 때문입니다.
따라서 매 프레임마다 mesh의 값들을 그 mesh에 대응되는 cannon body의 값과 동기화 해야 합니다.
const update = () => {
  // object : mesh가 있는 물체
  // cannon body : object에 대응되는 cannon body 객체

  // 위치값 동기화
  object.mesh!.position.copy(cannonBody.position);
  // 회전값 동기화
  object.mesh!.quaternion.copy(cannonBody.quaternion);

  // ...

  renderer.setAnimationLoop(update);
}
5. Body Shape 수정
Cannon body의 모양은 three.js의 geometry 객체들이 아닌, cannon에서 지원하는 Shape 객체들로 구성해야 합니다. 위 예시에서 Body 선언과 함께 shape의 속성값으로 선언한 new CAN.Box()가 그 예시입니다.
shape: new CAN.Box(new CAN.Vec3(shape.width/2, shape.height/2, shape.depth/2))선언할 때 모양을 정의하지 않고 나중에 정하고 싶다면, Body 객체의 addShape() 함수를 이용해 추가할 수 있습니다.
// shape 없이 body 선언
const cannonBody = new CAN.Body({
    mass: mass,
    position: new CAN.Vec3(position.x, position.y, position.z),
})

// 이후에 shape 추가
cannonBody.addShape(new CAN.Box(new CAN.Vec3(width/2, height/2, depth/2)));

// 매개변수 :
// shape | 모양
// offset | 원점으로부터 떨어진 위치
// orientation | 회전한 방향
addShape()는 중복을 허용합니다. 반복해서 shape을 추가하면, 기존 body shape과 합쳐집니다.
// Box collider
const box = new CANNON.Box(new CANN.Vec3(1, 1, 1))

// Sphere collider
const sphere = new CAN.Sphere(0.8)

// union => box와 shpere가 합쳐져 하나의 shape을 형성함
body.addShape(box)
body.addShape(sphere, new CANNON.Vec3(0, 1.2, 0))
Shape을 제거하는 것은 조금 복잡합니다. 이는 addShape()가 아래와 같이 구현되었기 때문입니다.
/**
 * Add a shape to the body with a local offset and orientation.
 * @method addShape
 * @param {Shape} shape
 * @param {Vec3} offset
 * @param {Quaternion} quaternion
 * @return {Body} The body object, for chainability.
 */
Body.prototype.addShape = function(shape, _offset, _orientation){
    var offset = new Vec3();
    var orientation = new Quaternion();

    if(_offset){
        offset.copy(_offset);
    }
    if(_orientation){
        orientation.copy(_orientation);
    }

    this.shapes.push(shape);
    this.shapeOffsets.push(offset);
    this.shapeOrientations.push(orientation);
    this.updateMassProperties();
    this.updateBoundingRadius();

    this.aabbNeedsUpdate = true;

    return this;
};
한 번 shape이 추가될 때 마다, addShape() 함수는 모양(shape), 위치(_offset), 그리고 방향(_orientation) 값을 각각 세 가지 리스트 안에 집어 넣습니다.
- this.shapes
- this.shapeOffsets
- this.shapeOrientations
따라서 shape 하나를 제거하려면, 위 세 값들을 모두 바꿔주어야 합니다.
cannonBody.shapes.length = 0;
cannonBody.shapeOffsets.length = 0;
cannonBody.shapeOrientations.length = 0;

cannonBody.addShape(new CAN.Sphere(this.width/2 * this.scale.z));
+) 만약 랜더링 중 shape이 바뀌었다면, 바뀐 만큼의 질량과 관성 값을 다시 계산해주어야 합니다.
// 질량 / 관성 다시 계산
body.updateMassProperties()

// AABB 갱신
body.aabbNeedsUpdate = true'Frontend' 카테고리의 다른 글
| [Three] 11. Sprite & Mesh - 텍스트 출력하기 (0) | 2025.09.10 |
|---|---|
| [Three] 10. Ray casting (0) | 2025.09.04 |
| [Three] 1인칭 화면 회전 만들기 (0) | 2025.07.09 |
| [Three] 윈도우 크기에 따라 반응형으로 만들기 (0) | 2025.07.05 |
| [Three] 09. Loader - GLTF (0) | 2025.06.16 |